
Virtual Home Lab Setup for Cybersecurity - Part 7: Account Setup and Domain Join VMs
Part 7 - User Account Setup and VM Joining

Overview
In this part, we’ll create an administration account, and four normal users for the VMs we made in the last step. Before proceeding, make sure the server & the firewall are running.
Creating a Domain Admin
Once you are signed in to the server, click the Windows logo in the bottom left and search for “Active Directory Users and Computers”.
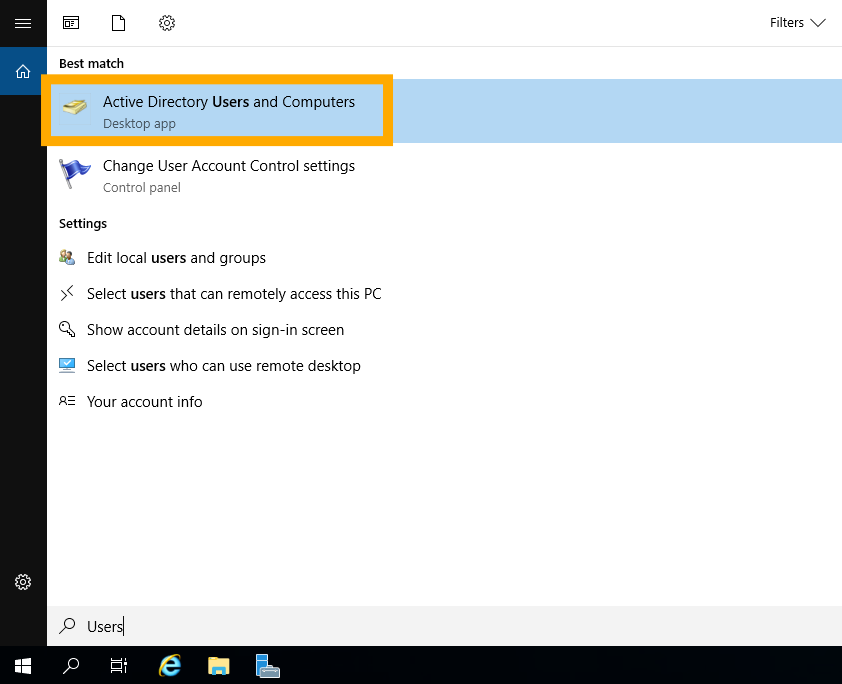
In this menu, right-click on your domain name and choose “New > User”. In the new object window that opens, enter details for your admin user.

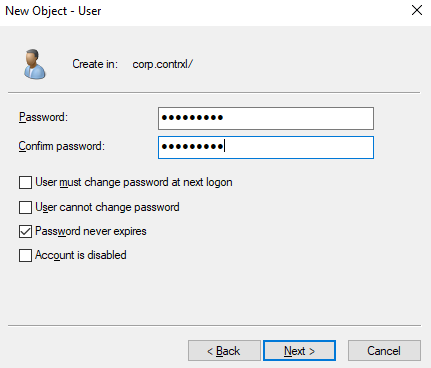
Click “Next” and then set a password for your admin user. Make sure you uncheck “User must change password at next logon” and check “Password never expires”.
To make this a domain admin, expand your domain and choose “Users”. Double-click the “Domain Admins” group, choose “Add”, enter the name of the account you just created under “Object names…”, press “Check Names” and then “OK” to finalise. Once this dialog closes, press “Apply” and then “OK” again.

To test that this works, click the Windows logo, then the user icon and “Sign Out”. Back on the sign in page, choose “Other User” and enter your new admin credentials.

Creating Normal Users
Once you are signed in again, head back to “Active Directory Users and Computers”. Right-click your domain and choose “New > User”. We’ll create 4 new users, you can call them whatever you like, mine are:
Jane Doe
John Doe
Alice Doe
Bob Doe
Big family. For the password, uncheck “User must change password at next logon” and enable “User cannot change password” and “Password never expires”.

Once you have created the first user, select your domain, right-click the user and choose “Copy”.

Create 3 copies of your first account, giving each one a different name. This is just a lab, so don’t overcomplicate the passwords, I have the same password for all 4 accounts.
Setting up Windows 11 VMs
Boot up one of the Win 11 VMs, proceed through the installation. Once the device restarts, you should see “Who’s going to use this device?”, select “Even better, use an online account”.

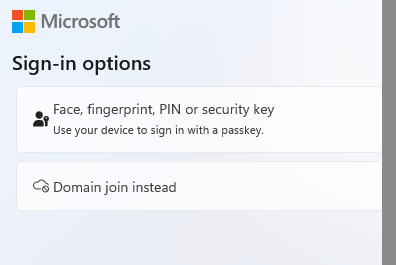
On the next page, choose “Sign-in options” and then “Domain join instead”.
Enter an admin name and password, set your security questions, and continue setup. Once setup is completed, login using the account you just created. Select the Windows logo and then search for “Access work or school”. In here, click “Connect”, then “Join this device to a local Active Directory domain”.

Enter your domain name in the “Join a domain” prompt. Then, enter Jane’s details in the new window and press “OK”.

Press “Skip” on the next “Add an account” step then restart the machine. You should now be able to sign in using Jane’s credentials. Repeat these steps on the second VM for the John Doe user.
Setting up Windows 10
Boot one of the Windows 10 VMs and proceed through the on-screen setup instructions. When you reach the “Sign in with Microsoft” screen, select “Domain join instead”.

On the next step, create some generic admin credentials and then proceed with setup following the on-screen instructions. Once you reach the desktop, search for “PC”, from the list, choose “Properties”.

Scroll to the bottom of these settings, click “Rename this PC (advanced)”. In the new window, click “Change”. Then, click the “Domain” button and enter your domain name.

Enter the credentials for Bob Doe in the resulting window. Click “OK” on the two pop ups and then restart the VM. Once the machine reboots, choose “Other User” and login as Bob. Repeat this process for the other Win 10 VM for Alice.
Finalising
To finish up, you should install the VirtualBox Guest Additions on each VM. The steps for this are the same as the ones we used to install the Guest Additions on the server, you can refer to these same instructions for each VM.
We should now take snapshots of each machine in our AD setup. Snapshots save the entire system state as it is, allowing for a quick restoration to default state. To do this, select one of the VMs and click the hamburger menu next to it, from here, click “Snapshots”.
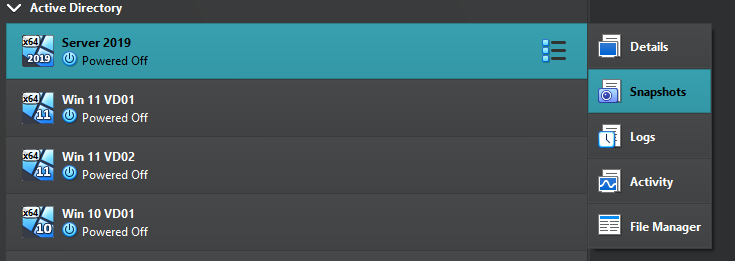
On the right hand pane, click “Take”. Give the snapshot a suitable name. Do this for each of the AD machines we setup. You can now restore this clean snapshot at any time by selecting it and choosing “Restore”. This is good if you break something, or change something you can’t reverse.

In the next part, we’ll setup a new VM and configure Splunk to ingest logs from our server.