
Virtual Home Lab Setup for Cybersecurity - Part 4: Configure Firewall Rules
Part 4 - Configuring Firewall Rules

Overview
In this post, we’ll setup basic rules for the firewall using the Kali Linux management VM. These rules will allow our subnets to talk to each other, and the outside network (if permitted!).
Prerequisite Action
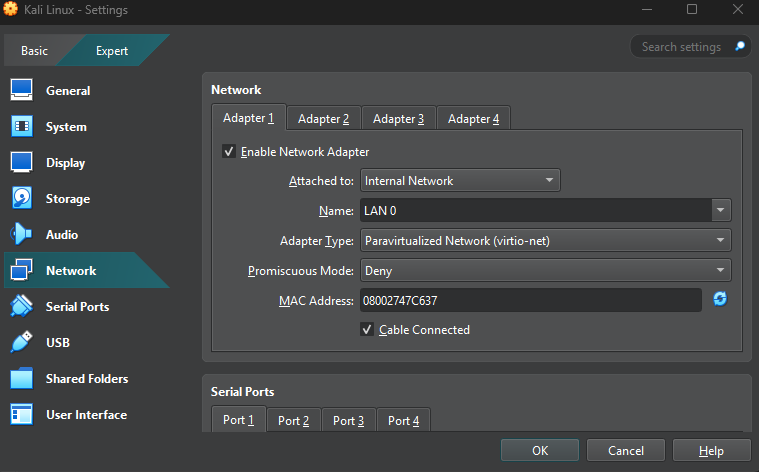
Make sure you have already started the pfSense firewall. Once this is running, we’ll make a small change to the Kali Linux VM before starting it. Select the VM and then “Settings”. Open “Network”, and change “Adapter 1” to “Internal" Network” on “LAN 0” as a “Paravirtualized Network (virtio-net)”. Once this is done, boot up the Kali machine, sign in and we’re good to go!
pfSense Advanced Configuration
On the Kali machine, open Firefox and navigate to https://10.0.0.1. This is your firewall management interface. You will get a “Potential Security Risk” warning, you can ignore this and proceed. On the login page, use admin and pfsense as default access credentials.
Proceed through the first time setup steps, on Step 2 of 9, make sure you check the “Override DNS” box at the bottom of the page before proceeding. On Step 4 of 9, at the very bottom of the page, uncheck the “Block Private Networks from Entering via WAN” box. We are using a virtual WAN interface, so we need this unblocked. Continue on and set a new password for the admin user.
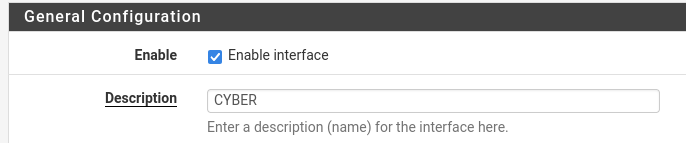
From the new dashboard, select “Interfaces” at the top and then “OPT1”. Change the description of this interface to “CYBER”, scroll down and press “Save” and then “Apply”.
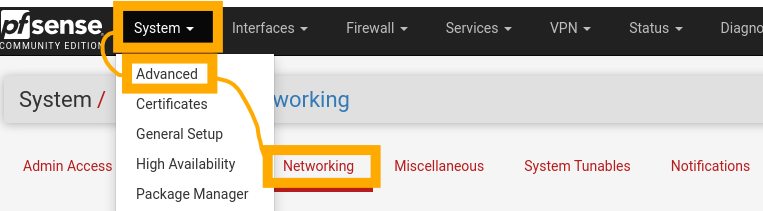
Do the same for “OPT2”, but name this “AD”. Now, from the top bar, select “System”, then “Advanced” and then “Networking”.
Scroll to the very bottom of this menu and enable “Disable Hardware Checksum Offload”, this will help improve the performance of pfSense. Once you do this and save, you will be asked to reboot pfSense. Press “OK” and wait for the reboot.
DNS Setup
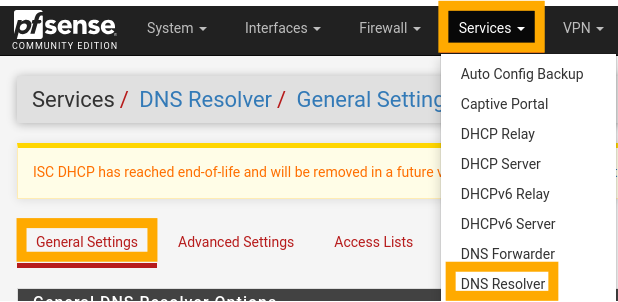
To setup DNS, select “Services”, then “DNS Resolver”. Scroll to the bottom of the “General Settings” and enable both “Register DHCP Leases in the DNS Resolver” and “Register DHCP Static Mappings in the DNS Resolver”.

Next, choose “Advanced Settings” and enable “Prefetch Support” and “Prefetch DNS Key Support”.
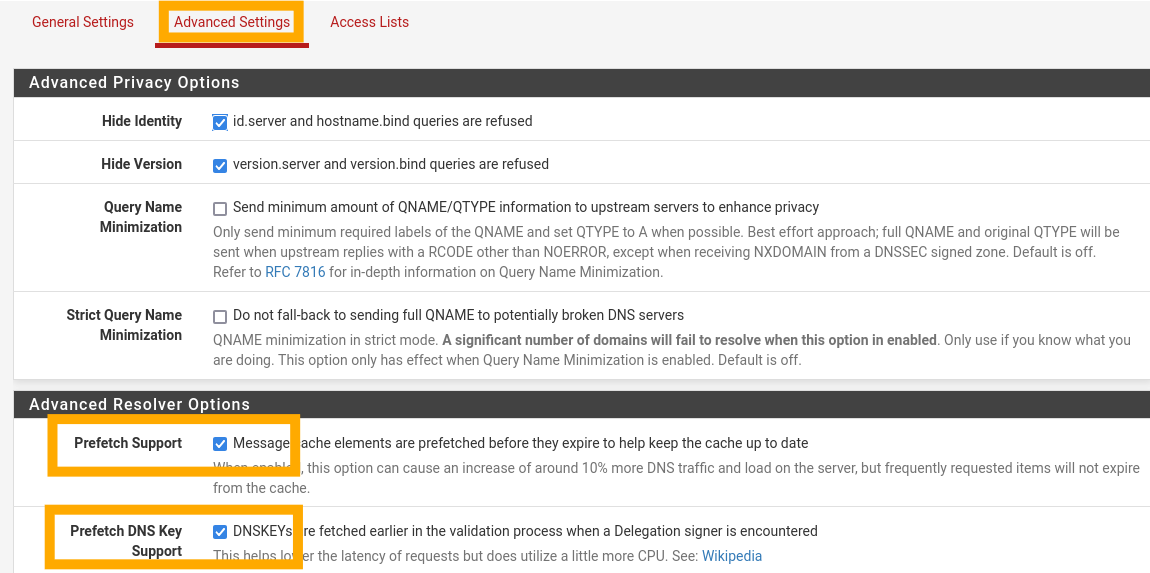
Make sure you save and apply after setting these!
Set Kali Static IP
Select “Status” and then “DHCP Leases” from the top menu. Here, you should see your Kali machine. To assign this a static IP address, click the white square (I have a pencil where it would be, I have already set the mapping). Set the IP address to 10.0.0.2, save and apply this.

To refresh you Kali IP address, enter the following command:
sudo ip l set eth0 down && sudo ip l set eth0 up
If you run ip a l eth 0 you should now see that your IP address is 10.0.0.2.
Set LAN Rules
To begin setting our firewall rules, select “Firewall”, then “Rules”, and then “LAN” from the top menu.

Press the green “Add rule to the top of the list” button to add a new rule. Add a rule with the following options:
Action: Block
Address Family: IPv4 + IPv6
Protocol: Any
Source: LAN Subnets
Destination: WAN Subnets
Description: Block access to services on WAN interface.
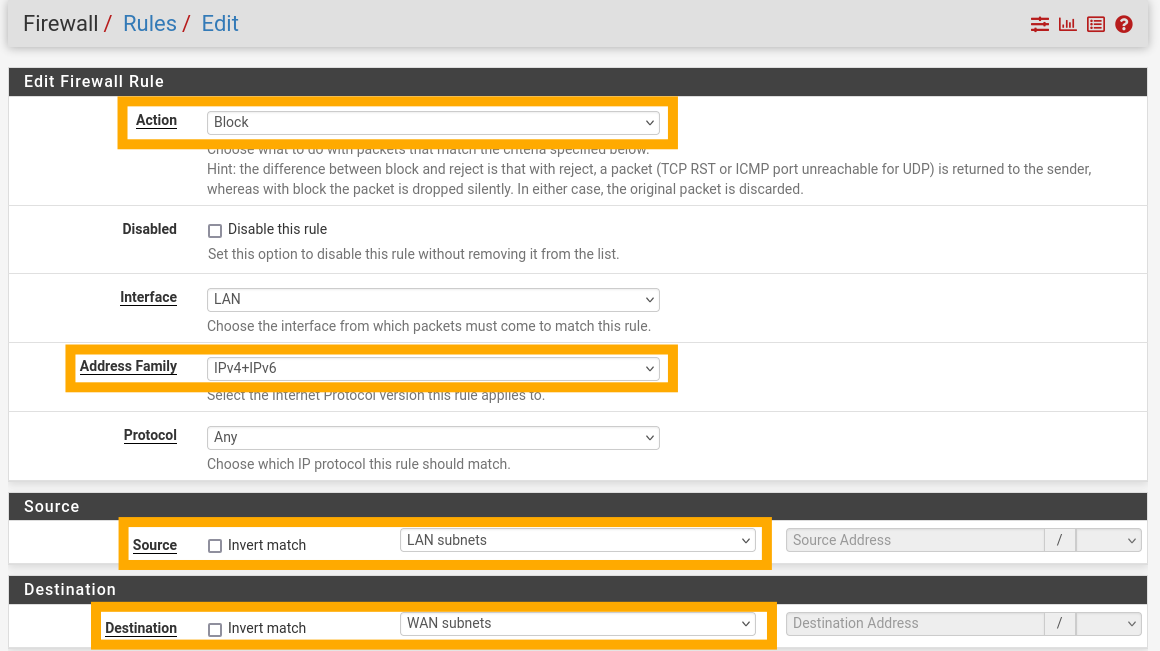
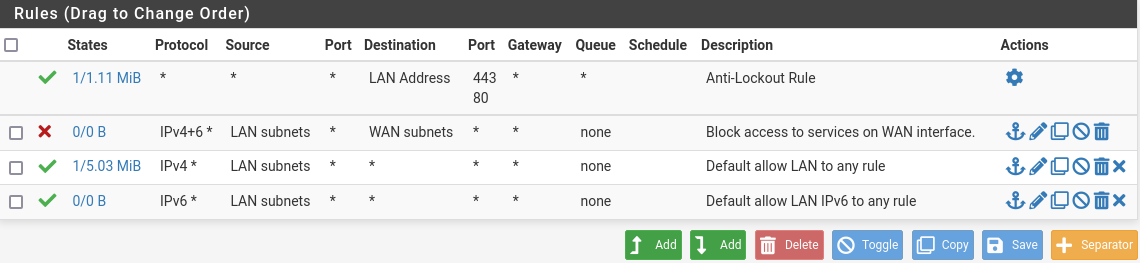
Save and apply this, your LAN rules should now look like below:
Set CYBER Rules
Creating an Alias
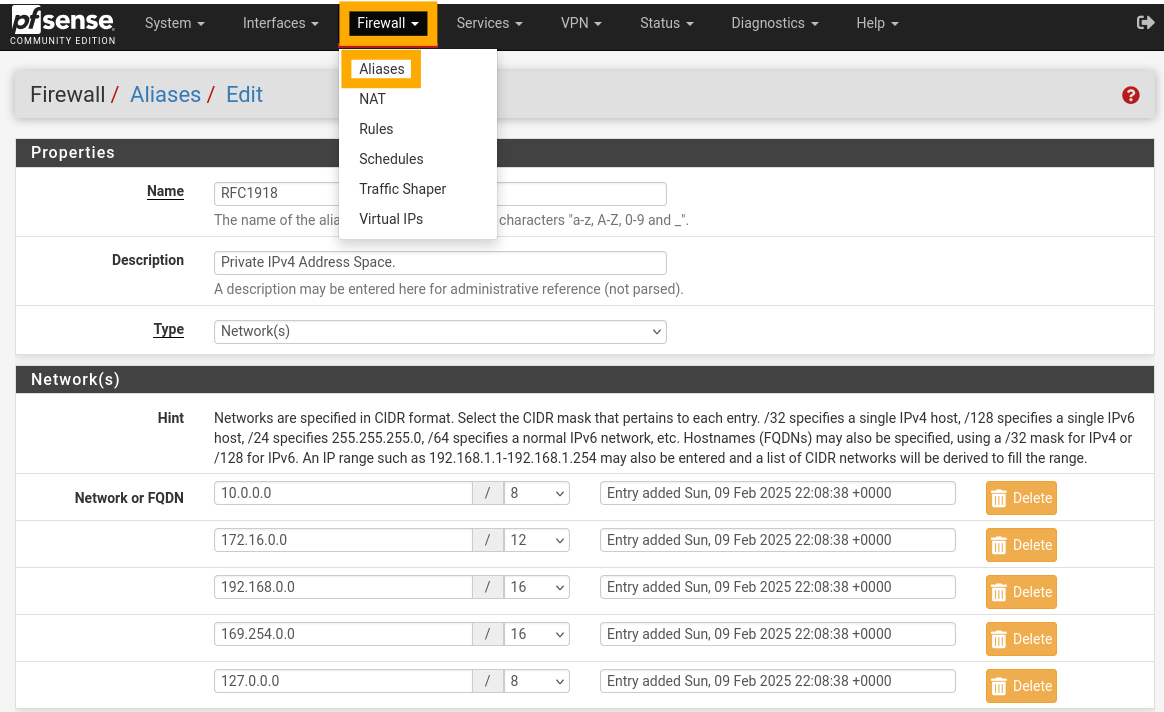
Before setting up the CYBER rules, an alias is needed. To set an alias, select “Firewall”, then “Alias” from the menu. On the “IP” tab, press “Add” to create a new alias. Create an alias with the following definition:
Name: RFC1918
Description: Private IPv4 Address Space.
Type: Network(s)
Network: 10.0.0.0/8
Network: 172.16.0.0/12
Network: 192.168.0.0/16
Network: 169.254.0.0/16
Network: 127.0.0.0/8
Save and apply this, then go back to “Firewall” and “Rules”. This time, select “CYBER”. For these, press “Add rule to end of list” each time and configure the following rules:
Rule 1:
Action: Pass
Address Family: IPv4 + IPv6
Protocol: Any
Source: CYBER subnets
Destination: CYBER address
Description: Allow traffic to all devices on CYBER network.
Rule 2:
Action: Pass
Address Family: IPv4
Protocol: Any
Source: CYBER subnets
Destination: Address or Alias - 10.0.0.2
Description: Allow traffic to Kali Linux VM.
Rule 3:
Action: Pass
Address Family: IPv4
Protocol: Any
Source: CYBER subnets
Destination: Address or Alias - RFC1918 (For this one, check the “Invert Match” box)
Description: Allow to any non-private IPv4 address.
Rule 4:
Action: Block
Address Family: IPv4
Protocol: Any
Source: CYBER subnets
Destination: Any
Description: Block everything else.
Remember to save & apply after each rule! Your final CYBER rule list should appear as:

AD Rules
Select “AD” from the “Rules” menu. For each of these rules, use the “Add rule to the end of the list” button. Create the following rules:
Rule 1:
Action: Block
Address Family: IPv4 + IPv6
Protocol: Any
Source: AD subnets
Destination: WAN subnets
Description: Block access to services on WAN interface.
Rule 2:
Action: Block
Address Family: IPv4 + IPv6
Protocol: Any
Source: AD subnets
Destination: CYBER subnets
Description: Block traffic to CYBER interface.
Rule 3:
Action: Pass
Address Family: IPv4 + IPv6
Protocol: Any
Source: AD subnets
Destination: Any
Description: Allow traffic to all other subnets and internet.
Your final AD rules should look like:

Finalising
To finish up, select “Diagnostics” and then “Reboot”. Once the firewall reboots, all the settings will be in place! In the next posts, we’ll setup the Active Directory labs.