


Virtual Home Lab Setup for Cybersecurity - Part 1: Topology and VBox Setup
Part 1 - Topology and Setting up VirtualBox

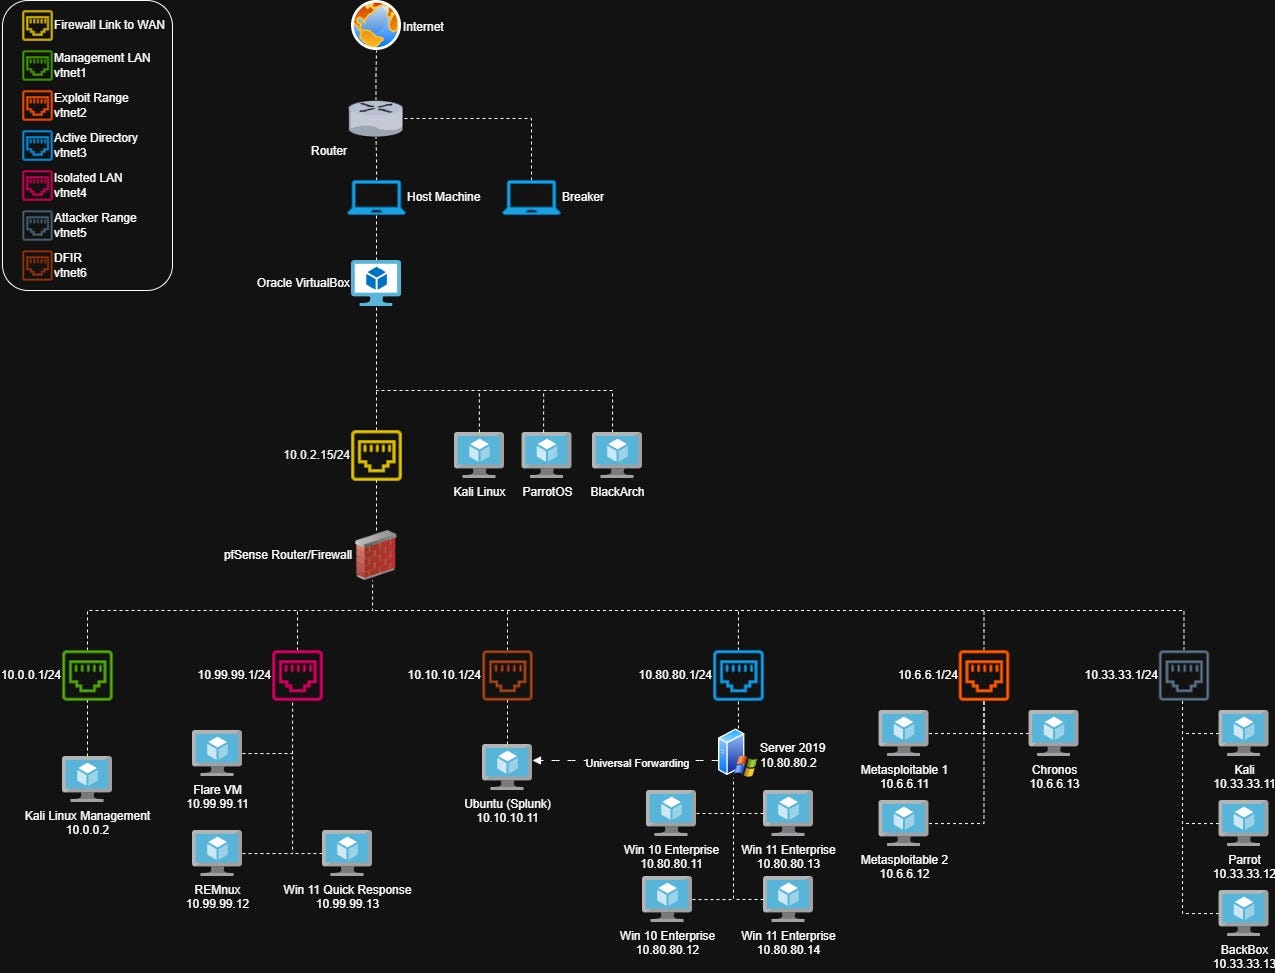
Topology
The home lab setup I use is heavily inspired by David Varghese’s Virtual Security Home Lab guide - you should check that out. My current topology looks like this:
In this series of posts, I’ll walk through how its all setup and the relevant specs of my host devices. The basics are:
Two physical machines, one desktop and one laptop. The desktop is a host for all the machines on Oracle VirtualBox. The laptop runs BlackArch Linux and acts almost solely as a machine I use to run HashCat. The laptop is a stock Dell Latitude 5420. The desktop has a Intel i7-9700K CPU (8 core, 3.6GHz) processor, 16GB RAM and a NVIDIA GeForce RTX 3060.
Oracle VirutalBox running 3 standalone machines: Kali Linux, ParrotOS & BlackArch. These are not behind the firewall and are used primarily for CTFs, HackTheBox, TryHackMe, and sometimes bug bounty stuff.
Oracle VirtualBox running 7 subnets: WAN, Management LAN, Exploit Range, Active Directory, Isolated LAN, Attacker Range, DFIR. The ranges are used as follows:
WAN: Connection from pfSense firewall to the outside network.
Management LAN: Kali Linux machine used to administer firewall.
Exploit Range: Pre-built, vulnerable machines.
Active Directory: One domain controller, two Windows 10, and two Windows 11 PCs.
Isolated LAN: Offline subnet used for malware analysis/sandboxing.
Attacker Range: Kali, Parrot and BackBox for a variety of attacker machines with lots of tooling.
DFIR: Splunk running on Ubuntu performing logging for the server.
Get Started
To get started, you’ll need to download and install Oracle VirtualBox from here.
If you get an error when trying to install Oracle VirtualBox, you will also need to download and install the x64 version of the latest C++ Redistributable. Scroll down a little on that page, download and install the x64 version and then retry your Oracle VirtualBox installation. It should now work.
Once this is installed and setup, you can go ahead and download the following two ISO files:
pfSense Latest (version 2.7.2 at time of writing, download is ~500MB)
Kali Latest (Use the recommended installed, its about 4GB)
If you want to download all the required files at once, head to the bottom of the page to see all downloads.
All we’ll do at this point is tweak some settings in VirtualBox, the next post will cover the initial setup of the Kali management device.
VirtualBox Setup
Once you have installed VirtualBox, head back to the download page and grab the VirtualBox Extension Pack too - this is pretty much necessary. First thing you want to do is install this extension pack, so open up VirtualBox, click the list/hamburger menu next to “Tools” and choose “Extensions”.

In this menu, choose “Install” and select the extension pack from wherever you saved it. Proceed through the prompts to install the pack.

Next, select “File” then “Preferences” from the VirtualBox toolbar. In the window that opens, make sure you are working in “Expert” mode by clicking the button. You should also change your default folder to wherever you have most space. In my screenshot, my VMs are saving to my E:\ drive.

With that, we are good to move on and start setting up the actual lab.
All the Downloads
There will be a lot of downloading in this series, if you want to get ahead and download all the required ISO’s before moving on, they are all linked below (just make sure you have the disk space!):
Oracle VirtualBox (7.1.6 at time of writing)
pfSense Latest (2.7.2 at time of writing)
Kali Latest (Recommended Installer)
Ubuntu (24.04.1 LTS at time of writing)
Splunk v9.1.2 (Alternatively, sign up here for latest version)
Splunk Universal Forwarder v9.1.2 (Alternatively sign in here for latest version)
ParrotOS (Choose “Virtual” > “Security” > “AMD64” for download)
REMnux (You want the VirtualBox OVA file)